Have you ever wished you could seamlessly move everything from one SD card to another without losing a single file? Maybe you’re upgrading to a larger card, or perhaps you want a safe backup of precious data.
SD card cloning helps in data backup, as well as upgrading storage or in the process of setting up one device after another, as it ultimately saves time.
This guide provides the basics in cloning SD cards coupled with Special instructions for both Windows and MAC users.
Using nothing more than what is on your computer and a bit of time, you can clone SD card with the knowledge that every File and tweak you brought with it will remain intact.
Why Do We Need to Clone SD Cards?
From protecting data backups to making the process of increasing storage easier, cloning an SD card has several advantages.
The following are the main motivations for cloning:
1. Formatting Backup
When you format an SD card, you wipe it clean, clearing all data. When you format an SD card, you wipe it clean, clearing all data.
But at times, formatting is required due to some issues or as a way of setting up the card to an entirely new device.
This is the benefit of formatting the SD card, one can clone SD card beforehand to create a backup of anything that is required.
This way one does not have to worry about losing data since they can make a duplicate as a safeguard.
2. Device Setup
Cloning an SD card might save you time and effort when you need the same data or settings on several devices.
For example, if you have many cameras, tablets, or other devices that require identical configurations, cloning allows you to replicate all of your applications, data, and settings in one simple action.
In this manner, you may be certain that every device is consistent and avoid the need for repeated installations.
3. Storage Upgrades
Running out of space on your SD card? As storage demands grow, upgrading to a larger SD card is common.
Instead of manually transferring files and reorganizing everything, cloning allows you to move all data, maintaining the same structure and setup.
It’s a quick and easy way to upgrade storage without any interruption to your workflow.
4. Bootable Cards
Certain devices, like Raspberry Pi computers, use SD cards as boot drives. A bootable SD card contains system files required for the device’s functionality.
Cloning bootable SD cards guarantees a backup of your system configuration. If the original SD card dies, just swap in the cloned version and continue using the device without altering it.
How to Clone SD Card on Windows?
Cloning an SD card on Windows is simple with the proper tools. Here, we’ll use Win32 Disk Imager, a free and dependable application created exclusively for making and recovering disk images.
Step 1: Download and Install Win32 Disk Imager
Start by downloading Win32 Disk Imager from a trusted source, like the official website.
Follow these steps:
- Go to the Win32 Disk Imager download page.
- Download the installer and open it to begin installation.
- Follow the setup prompts to install the software, then open the program.
Step 2: Insert the SD Cards
Now, use an SD card reader to connect your source SD card—the one you wish to clone—to your computer.
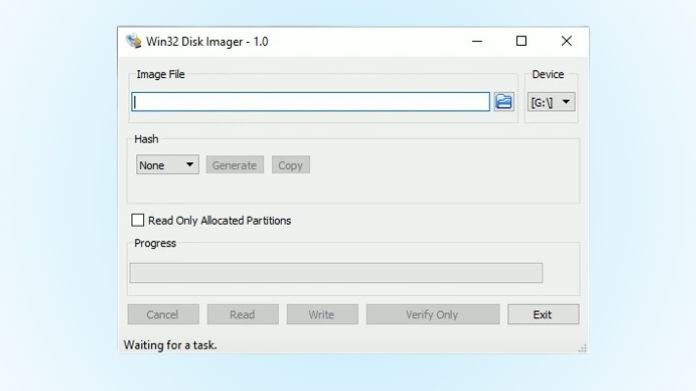
Next, take the following action:
- Open Win32 Disk Imager.
- Ensure that the software properly recognizes your source SD card.
- Identify which SD card mounted is the source and which is to be the target (a new or empty one).
A high-quality SD card reader can prevent data errors, so ensure everything is connected securely.
Step 3: Create an Image of the Source SD Card
Next, it’s time to create a disk image of the source SD card:
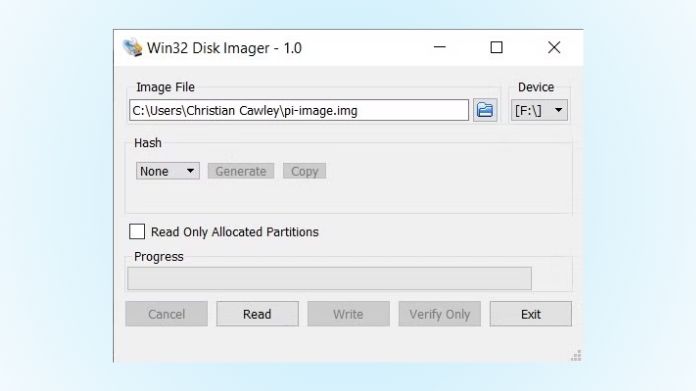
- Under “Image File” in Win32 Disk Imager, choose a location on your computer to save the disk image.
- Select the drive letter of the source SD card under “Device.”
- Click Read to begin creating the disk image.
Depending on the size of the card, this might take a few minutes, but it will save a duplicate of your SD card as a single picture file on your computer.
Step 4: Write the Image to the Target SD Card
Once the disk image has been created, connect the target SD card—the card onto which you wish to clone data—to your computer.
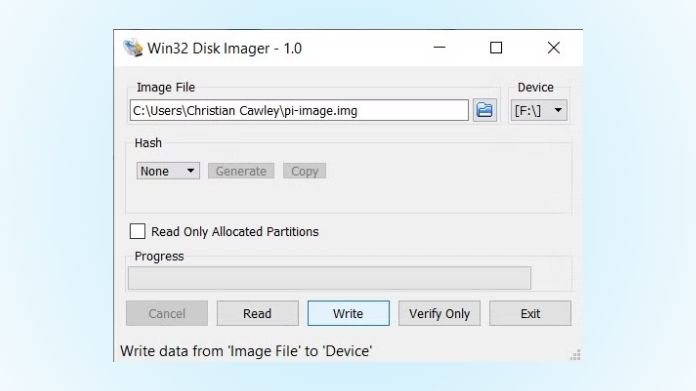
- In Win32 Disk Imager, select the saved image file from your computer.
- Under “Device,” select the target SD card’s drive letter.
- Click Write to begin cloning the image to the target SD card.
Be sure not to disconnect devices during this process, as interruptions can result in data errors.
Step 5: Verify the Data
Once the process is complete, safely eject the target SD card and reinsert it. Open a few files or check settings to confirm that everything transferred correctly.
How to Clone SD Card on Mac?
Disk Utility and Terminal are needed to clone SD card on a Mac. Even for bootable cards, creating and writing disk images is made simple by these integrated tools.
Step 1: Create a Disk Image of the Source SD Card
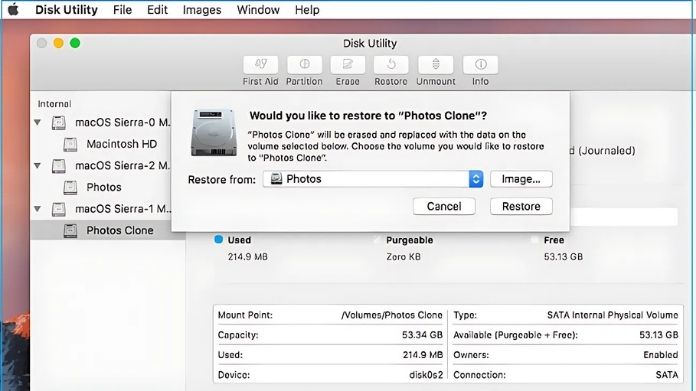
- Insert the source SD card (the one you want to clone) into your Mac’s SD card reader.
- Open Disk Utility by going to Applications > Utilities > Disk Utility.
- In Disk Utility, select your source SD card from the left sidebar.
- Go to File> New Image > Image from [Your SD Card’s Name].
- Choose a location to save the disk image, select Compressed (to reduce file size), and click Save.
This creates a disk image file (.dmg) of your SD card, which is an exact copy of its contents.
Step 2: Format the Target SD Card
Now, insert the target SD card (the one where you want to clone the data).
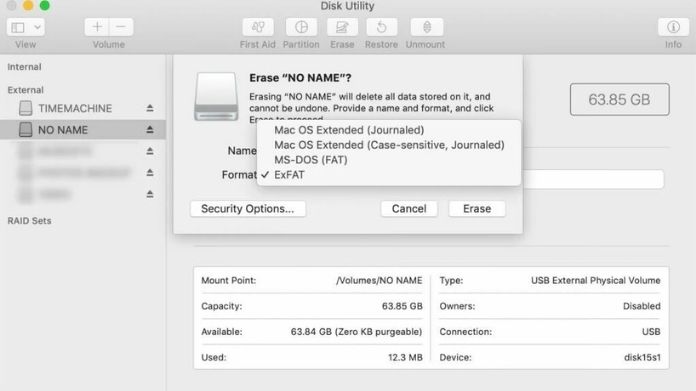
- In Disk Utility, select the target SD card from the sidebar.
- Click Erase to format it. Choose ExFAT (or another format compatible with your devices), name it, and click Erase.
Formatting prepares the SD card for cloning so it’s compatible with your device.
Step 3: Clone Using Terminal
Now, let’s use Terminal to transfer the disk image to the target SD card.
- Open Terminal (Applications > Utilities > Terminal).
- Type the following command to locate your SD card’s path:
diskutil list
- Find the identifier for the target SD card (e.g., /dev/disk2).
- Use the following command to write the image to the target card:
sudo dd if=/path/to/imagefile.dmg of=/dev/diskN bs=1m
- Replace
/path/to/imagefile.dmgwith the path to your saved disk image. - Replace
/dev/diskNwith the target SD card’s identifier. - Press Enter and wait for the process to finish. This can take some time, so be patient.
Step 4: Eject and Verify
After that, securely remove and reinstall the SD card. Verify your files or settings to make sure the cloning process was successful.
Closure
Although it may seem complicated, cloning an SD card is actually rather simple if you know the procedures.
Cloning provides a simple and dependable solution to handle your SD cards, from backup security to storage upgrades.
Whether you’re using Windows or Mac, this instruction will let you effortlessly clone SD card.
Try it and experience the peace of mind that comes with knowing your data is secure and readily shareable!
