You’re about to start your favorite game on your Steam Deck when you realize you’ve run out of storage space. Isn’t this frustrating?
You choose the Steam Deck for its mobility, but you’re now battling to fit additional games. This is when an SD card for Steam Deck becomes useful.
It can expand your storage and keep all your games accessible. But there’s a catch: you need to format it to work with the Steam Deck.
Ever tried to download a new game only to find out you have to delete an old favorite first? It’s a typical problem for many Steam Deck users, particularly when managing a large collection of intriguing titles.
Using an SD card for extra storage is a simple solution, but to make it work seamlessly, you need to format SD cards properly.
This article will show you why formatting is crucial, how to do it step by step, and which SD card is appropriate for your Steam Deck.
Why Format Your SD Card for Steam Deck?

You might be wondering, “Why do I need to format the SD card in the first place?” Can’t you just get in any SD card and use it straight away?
While it might be handy, that is not exactly how things operate. Formatting is an important step that ensures the SD card works properly with the Steam Deck’s operating system.
It optimizes the card for the device, ensuring that it can store and run games effectively without hiccups.
There are several problems that might arise from an SD card for Steam Deck that is either unformatted or formatted wrongly.
The card may not even be recognized by your Steam Deck, or you may have decreased performance, such as sluggish game loading and frozen displays.
In some cases, using an unformatted card can even lead to data errors or loss. Proper formatting solves these issues by arranging the card’s file structure in a way that the Steam Deck can comprehend and use effectively.
Consider it like setting up a new shelf in your room. If you simply pile goods on it without arranging them, it becomes difficult to find what you need. Similarly, formatting your SD card allows the Steam Deck to easily access and handle files.
How to Format SD Card for Steam Deck?
Let’s begin the procedure to format your SD card for Steam Deck. It’s simpler than you would think, and you have a few alternatives based on your preferences.
Here’s a step-by-step instructions:
Formatting SD Card on the Steam Deck
- Insert the SD Card: Start by inserting your SD card into the Steam Deck’s card slot. Make sure it’s properly seated.
- Open System Settings: Activate your Steam Deck and proceed to the main screen. Next, choose “Settings” by navigating to the gear icon.
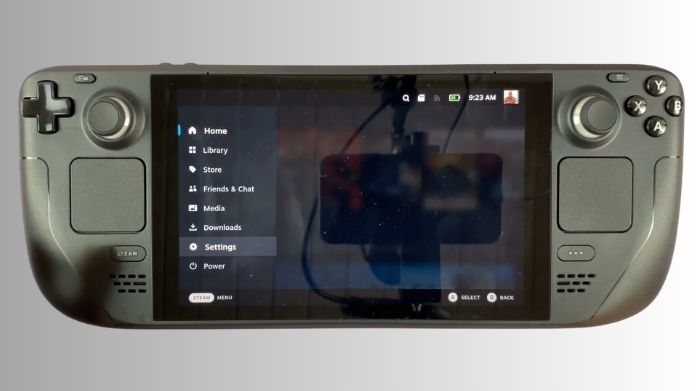
- Access Storage Options: Scroll down to find the “Storage” section. This is where you’ll manage internal and external storage devices.
- Select the SD Card: You should see your SD card listed here. Select it to view options.
- Prepare the SD card: Select “Format” from the menu. You will be reminded by a warning that this operation will remove all data from the card. Make a backup of everything significant that is on the card before continuing.
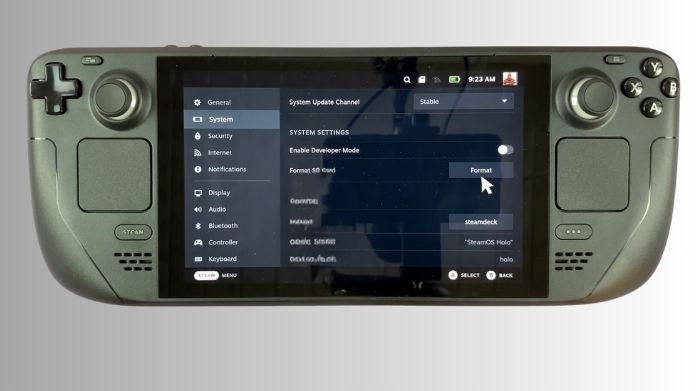
- Confirm and Wait: Confirm the formatting process. It will take a few moments to complete. Once done, the card is ready for use.
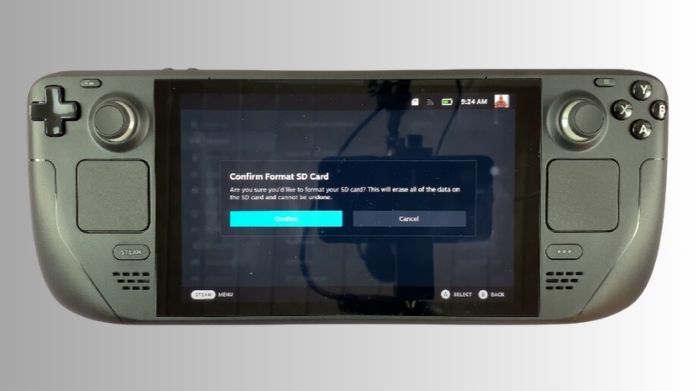
Formatting Using an SD Card Formatter (Alternative Method)
- Insert the SD Card into Your Computer: Use an SD card reader to insert the card into your computer.
- Download an SD Card Formatter: Download a reputable SD card formatting tool like SD Card Formatter. This tool is designed to properly format SD cards and ensure compatibility with a wide range of devices.
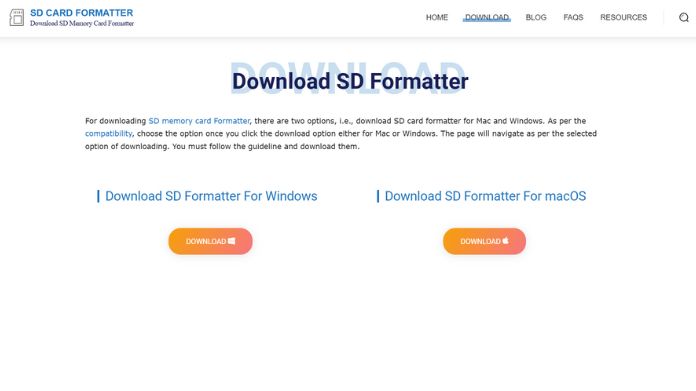
- Open the Formatter, then choose the SD card: Launch the program, pick the exFAT file system, and select your SD card from the list of devices. With exFAT, the Steam Deck functions best.
- Format the SD Card: Click “Format” and confirm the action. The tool will format the card, preparing it for use with the Steam Deck.
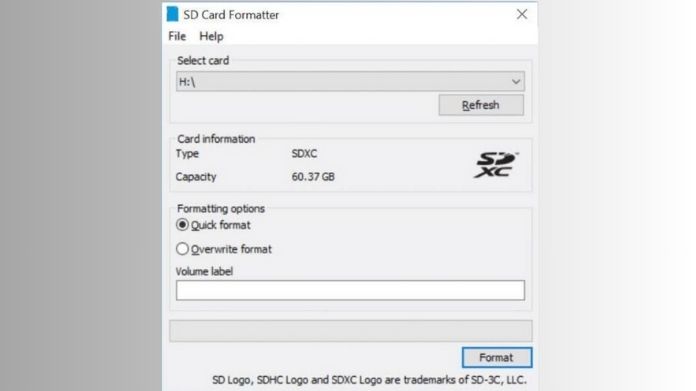
- Insert into the Steam Deck: After formatting, insert the card into your Steam Deck. You should now be able to use the card immediately once it has recognized it.
What Kind of SD Card is Used for Steam Deck?
Not all SD cards are the same, so it’s important to pick the right one for your Steam Deck. You’ll often see terms like “Class 10” and “UHS-I/UHS-II” on SD card labels.
These terms indicate the card’s speed class and bus interface, which affect how quickly data can be read from and written to the card.
For gaming, faster cards are preferable because they ensure smooth game performance and quick loading times.
For the Steam Deck, it’s recommended to use a Class 10 or UHS-I/UHS-II SD card. These cards offer higher read and write speeds, which is crucial when running large game files.
When it comes to storage, settling for a 128GB or 256GB card is typically okay. It strikes a healthy balance by providing enough space for several games without having to manage your game library often.
Quality also matters when selecting an SD card for Steam Deck. Reputable brands such as SanDisk, Samsung, and Kingston to be sure of consistent performance long known come with base quality and durability.
With a quality card, you’ll never experience data corruption or those unexpected issues in the future, and this would be a good choice for your Steam Deck setup.
Wrapping Up!
Before you go, don’t forget to format your SD card to get the most out of your Steam Deck. Formatting your card makes it compatible with Steam, and it provides additional storage beyond what the Deck can provide itself.
I’d recommend a fast, high-capacity, reputable brand for use as a storage device. Now, you’re ready to grow your Steam library and use your SD card to play your next favourite title on the Steam Deck!
