We’ve all been there—your Android device starts running out of storage, or it doesn’t operate as well as it used to.
Sometimes, the culprit is an improperly formatted SD card. It may be time to format SD card for Android.
Whether you’re inserting a new SD card, recycling one from another device, or simply troubleshooting, formatting might be the key to achieving peak performance and good data management.
In this post, we’ll go over the best ways to format SD card for Android, whether you’re on an Android smartphone, a Windows PC, or a Mac.
Do I Need to Format SD Card for Android?
Before we go into the how-to, let’s answer the question: Do you really need to format your SD card? The answer is dependent on your scenario.
Formatting a fresh SD card guarantees that it is properly set up for your Android smartphone.
Similarly, if you’re using an SD card from another device or experiencing troubles or performance issues, formatting can help.
Personally, I’ve experienced occasions when my Android phone seemed slow, just to realize that a simple format of the SD card restored it back to life.
By formatting your SD card, you may maximize storage, remove outdated data, and make sure your Android device is compatible with it.
Best Way to Format SD Card for Android
There are several ways to format an SD card for Android, each with its own benefits. The best method for you will depend on your needs and the tools you have available.
In this post, we’ll go over three different methods: formatting directly on your Android smartphone, using a Windows PC, and formatting on a Mac.
Each option is simple, but it’s critical to choose the one that best fits your needs.
1. Format SD Card on Android
One of the most convenient ways to format your SD card is directly on your Android device.
This method is especially useful if you don’t have access to a computer. It doesn’t require any additional tools and is quick and simple.
For me, this is my go-to option when I need a quick fix—a few touches on my screen are all it takes, and no software or wires are needed.
How to Format SD Card on Android?
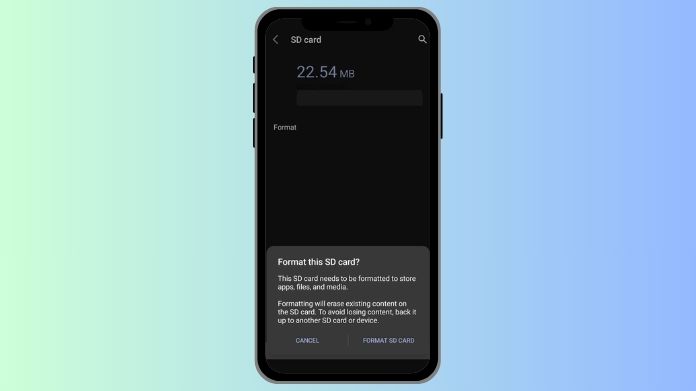
Here’s how you can format your SD card on an Android device:
- Open Settings: To begin, find your Android device’s “Settings” menu.
- Select Storage: Scroll down and tap on “Storage” or “Device Care,” depending on your device.
- Choose SD Card: Now, locate and pick your SD card under the list of storage options.
- Format: In order to format an SD card, tap “Format” or “Format SD card.” Verify your selection when asked.
Keep in mind that formatting will erase all data on the card; therefore, before formatting, make sure you have a backup of any important data. After the procedure is finished, you may use your SD card.
2. Format SD Card for Android on Windows
If you want a larger screen or want more control over the formatting process, a Windows PC may be the best choice.
Windows has additional file system choices and is best suited for sophisticated users who want to guarantee everything is set up correctly.
My Android smartphone once failed to identify my SD card properly. After attempting many ways, formatting it on Windows was the only one that worked.
Sometimes, having a little more control may make all the difference.
How to Format SD Card for Android on Windows?
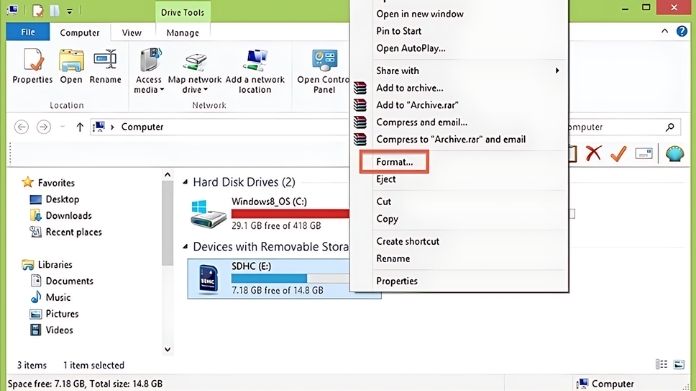
To format your SD card for Android on Windows, follow these steps:
- Connect the SD Card: Insert your SD card into your computer using an SD card reader or a built-in slot.
- Open File Explorer: Open “This PC” and find your SD card under “Devices and Drives.”
- Right-click and Format: Right-click on the SD card, then select “Format.” Make sure to pick the “FAT32” file system since it works with most Android devices
- Start Formatting: Click “Start” to begin the formatting process. Confirm any prompts that appear.
Once the process is complete, safely eject your SD card and insert it into your Android device. It should now be ready to use without any issues.
3. Format SD Card for Android on Mac
For people who are heavily invested in the Apple ecosystem or do not have access to a Windows PC, formatting an SD card on a Mac is an excellent option.
While the technique is identical to Windows, there are a few major distinctions that distinguish the Mac way.
Personally, I find the Mac interface easy to use, particularly when formatting SD cards with Disk Utility. It provides a seamless experience that is both powerful and user-friendly.
How to Format SD Card for Android on Mac?
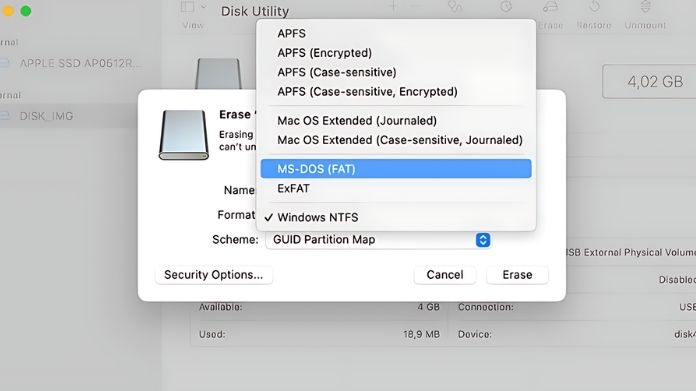
Here’s how you can format your SD card for Android on a Mac:
- Insert the SD Card: Use an SD card reader to connect your SD card to your Mac.
- Start the Disk Utility Application: Navigate to “Utilities,” then “Applications,” then launch “Disk Utility.“
- Locate Your SD Card: Locate and click on your SD card in Disk Utility’s sidebar.
- Erase and Format: Click on the “Erase” button, select “MS-DOS (FAT)” as the format (the Mac’s variant of FAT32), then rename your SD card if you’d like.
- Erase: Click “Erase” to start the formatting process.
Once done, eject the SD card, and it’s ready to use on your Android device.
Wrapping up
Formatting your SD card may appear to be a little task, but it may greatly enhance the speed and data management of your Android device.
Whether you format directly on your Android smartphone, Windows PC, or Mac, the procedure is straightforward and guarantees that your SD card is entirely optimized.
By following these steps, you’ll have a more efficient Android experience with plenty of space for apps, photos, and files.
So, if you want to keep your device running smoothly, format your SD card now!
