Ever plugged in an SD card only to find it’s not working properly? Or perhaps you need to free up space for new files? SD cards are ideal for storing images, movies, and documents, but they can get crowded or damaged, resulting in performance concerns.
If you’ve ever had these difficulties, you’ll be relieved to hear that formatting your SD card on a Mac may resolve them in only a few minutes!
In this guide, we’ll walk you through several easy methods to format SD card on Mac.
By the time you finish reading this post, you will know how to format your SD cards fast and simply, regardless of your level of computer expertise.
Why Format an SD Card on Mac?
There are many reasons you might need to format an SD card. One common reason is to clear out old data and free up space for new files.
If you’ve been using the card for a time, it might have accumulated superfluous data, slowing it down. Formatting removes everything, giving you a fresh start.
Another motive is to repair corrupted files. Files on an SD card can get corrupted, resulting in errors or rendering the card unusable. A simple format can resolve these issues by resetting the file system.
Formatting can assist you with using SD cards on many devices. Reformatting the card provides interoperability with a variety of devices, including cameras, cell phones, and computers.
This is especially beneficial if the card was previously formatted with a different operating system.
Regardless of the cause, formatting an SD card on a Mac is a simple and effective way to improve speed and resolve issues.
How to Format SD Card on Mac?
On a Mac, there are many methods for formatting an SD card. We provide you with the option to use third-party applications or the macOS built-in utilities.
Three methods—using SD Card Formatter, Terminal, and Disk Utility—will be covered in this section.
No need to worry—none of these methods are too complicated. Let’s dive in!
Method 1: Format SD Card on Mac With Disk Utility
Disk Utility is the easiest and most common way to format an SD card on a Mac. This built-in tool provides a graphical interface, making it simple for most users.
Steps to Format:
- Put the SD card into the Mac’s SD card slot or use an external card reader.
- Open Disk Utility from Applications > Utilities or by searching for it in Spotlight.
- Find your SD card listed under “External” on the left sidebar. Click on it to select it.
- At the top of the window, click the Erase button.
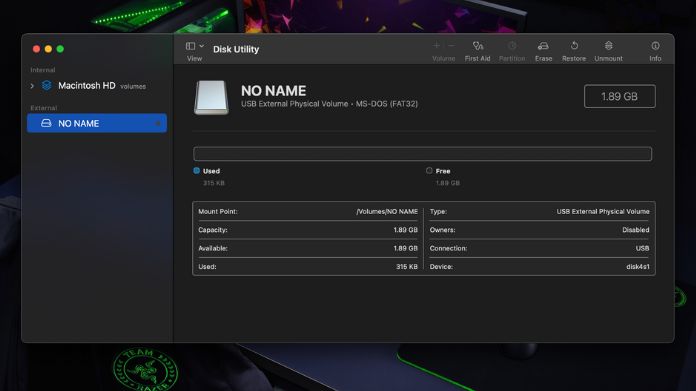
- In the pop-up window, choose the file system. For most users, exFAT is ideal, especially for larger SD cards. You may use FAT32 on smaller cards.
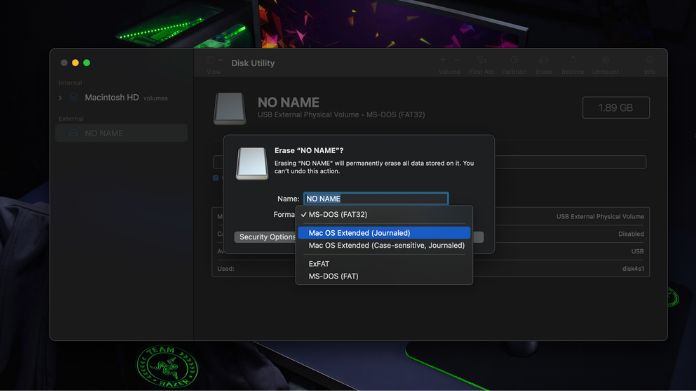
- If desired, name your SD card and then click Erase.
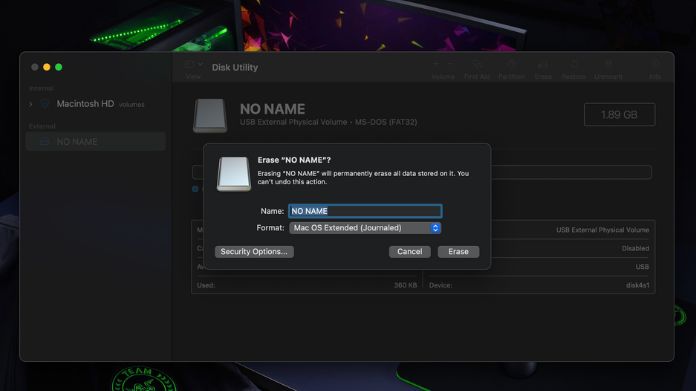
- Once the operation is finished, carefully remove the SD card by right-clicking it and selecting remove.
That is it! In only a few clicks, your SD card is formatted and ready to use.
How to Format SD Card to FAT32 on Mac?
FAT32 is a typical file system for tiny SD cards that is widely compatible with a variety of devices, including cameras and game consoles.
Here’s how to format your SD card to FAT32 on Mac using Disk Utility:
- Follow the same steps as in Method 1, but when selecting the file system, choose MS-DOS (FAT), which is FAT32 in macOS.
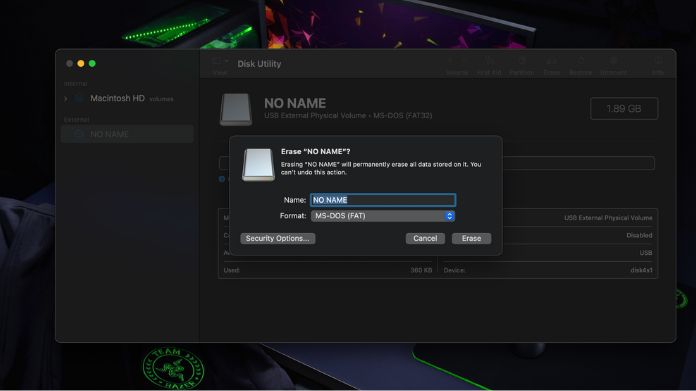
- To format the SD card, tap the “Erase” button.
For SD cards with 32GB or less, FAT32 is the best Format. It is a versatile option because it ensures that your card will work with most of the devices.
Method 2: Format SD Card on Mac Using Terminal
If you’re more comfortable using command-line tools, formatting an SD card through Terminal is another option.
For those who prefer a more technical approach or in the event that Disk Utility fails, the Terminal lets you manually control the formatting operation.
Steps to Format:
- Insert the SD card into the Mac.
- Open Terminal by searching for it in Spotlight.
- Type
diskutil listand press Enter. This will show all connected drives. Find your SD card in the list and note its disk number (e.g.,disk2).
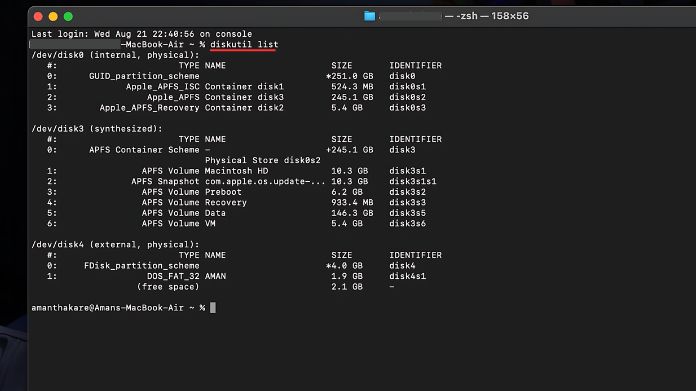
- Type the following command:
sudo diskutil eraseDisk FAT32 NAME MBRFormat/dev/disk#. ReplaceNAMEwith the desired name for your SD card anddisk#with the correct disk number.
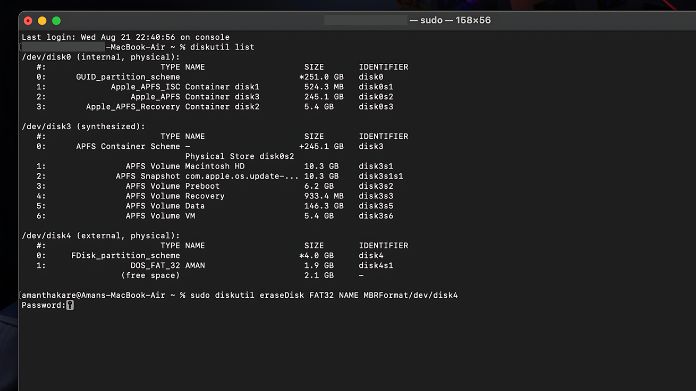
- Press Enter and enter your Mac password when prompted.
- Terminal will now format the SD card. Once the process is complete, type
exitto close the Terminal.
Be sure to double-check the disk number before proceeding with the Format, as formatting the wrong drive will erase all data on it!
Method 3: Format SD Card on Mac Using SD Card Formatter
If you want to use third-party software, SD Card Formatter is a free program created by the SD Association.
This software is intended exclusively for SD cards and is an excellent choice if you are working with big or high-performance cards.
Steps to Format:
- Visit the official website and download the macOS version.
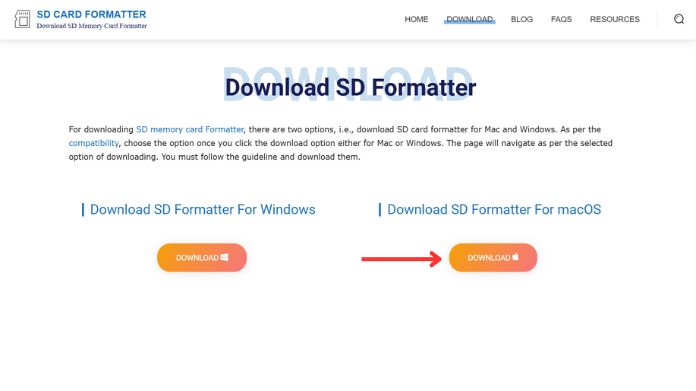
- Insert your SD card into your Mac and open the application.
- In the software, select the SD card from the list of available drives.
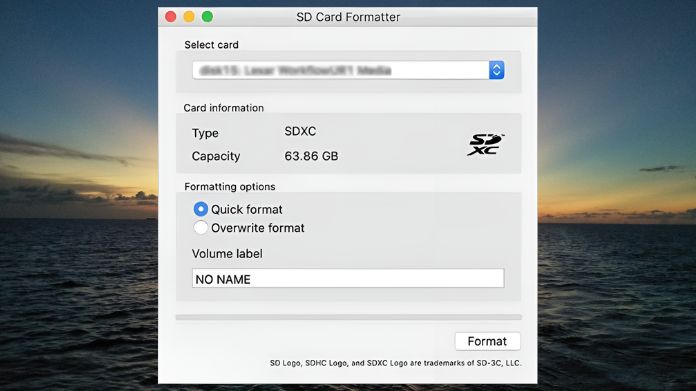
- To let the tool do its job, click Format.
- Many IT enthusiasts and experts use SD Card Formatter to optimize SD card performance since it is designed exclusively for formatting SD cards.
Final Words
Formatting an SD card on a Mac is a simple process that can be done in a matter of minutes.
Whether you prefer the user-friendly interface of Disk Utility, the technical precision of Terminal, or the specialized functionality of SD Card Formatter, there’s a method that fits your needs.
Before formatting, always remember to back up any important files, as formatting will erase all data on the card. Now that you know how to format your SD card on a Mac, you can keep your card running smoothly and error-free.
Happy Formatting!

