When you attempt to format your SD card or save a crucial file, you may see the dreaded notice, “This disk is write-protected.” This can be a very annoying snag whether using the card in a computer, phone, or camera.
Write protection prevents you from editing or deleting anything on the card, making it impossible to format without first addressing the problem.
But don’t worry—in this guide, we’ll explain why your SD card write protected and how to remove the protection so you can format it without a hitch.
What is a Write Protected SD Card?

A write protected SD card prevents you from modifying the data on it. You can still browse and read files, but you cannot edit, remove, or create new ones.
This function protects your files from unintentional alterations or deletion, making it ideal for crucial or sensitive material.
However, when you need to reformat the card, write protection can become a significant obstacle.
Why is an SD Card Write Protected?
Write protection might be activated for a variety of reasons. In many circumstances, all that is required is to engage the physical lock switch on the SD card.
However, software-related concerns might arise, such as destroyed data or a security setting that protects the card against unintended formatting.
Understanding the specific cause is the first step toward fixing the issue. Here are the common reasons your SD card might be write-protected:
- Physical Lock Switch: Many SD cards have a small switch on the side that enables or disables write protection.
- Corrupted File System: If the card has been removed improperly or damaged, the system may lock it to prevent further issues.
- Software Settings: If an SD card is being used in a camera or other device with security features, it may occasionally be write-protected by software.
How to Remove Write Protection From an SD Card?
To format a write protected SD card, first disable the protection. The approach used depends on whether the protection is physical or software-based.
Here’s how to remove write protection using several approaches.
1. Check the Physical Lock Switch
A hardware switch to enable or disable write protection is often included with SD cards.
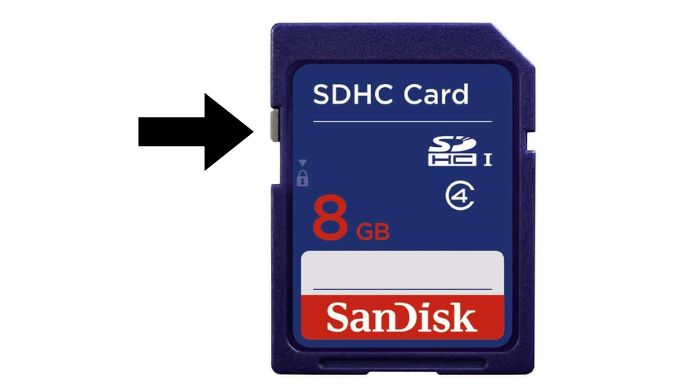
Here’s how to check and fix this:
- Locate the Switch: The switch is usually on the left side of the SD card (or the SD card adapter for microSD cards).
- Slide the Switch: To unlock the card, slide it upward to unlock the card.
- Test It Again: After unlocking, reinsert the card and check if the write protection has been removed.
This is the most common and easiest fix for write-protection issues.
2. Use Diskpart (Windows)
If the physical switch is not the issue, Windows users can utilize the Diskpart application to disable software-based write protection.
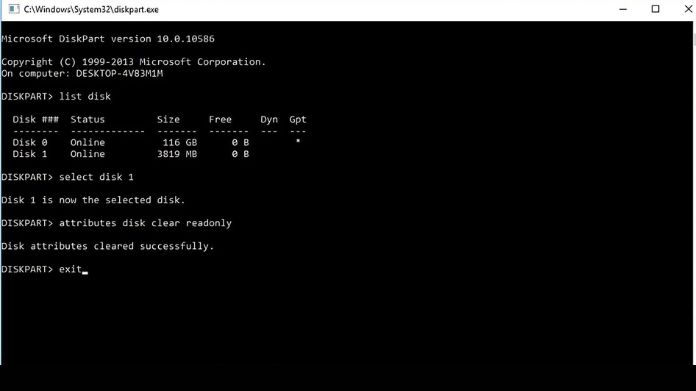
Here’s how!
- Open Command Prompt as Administrator:
- Press
Windows + R, typecmd, and hit Enter. - Type
diskpartand press Enter.
- Press
- List Available Disks:
- Type
list diskand press Enter. All of the drives that are attached to your computer will be shown. - Identify your SD card from the list by its size.
- Type
- Select Your SD Card:
- Type
select disk X(replace “X” with the number of your SD card) and press Enter.
- Type
- Remove Write Protection: Press Enter after typing attributes disk clear read-only. This will remove any software-based write protection.
- Exit Diskpart: Type exit and press Enter to close the tool.
This method is especially helpful for SD cards that are locked due to file corruption or security settings.
3. Use Disk Utility (Mac)
Write protection may be checked and removed by Mac users using the Disk Utility application.
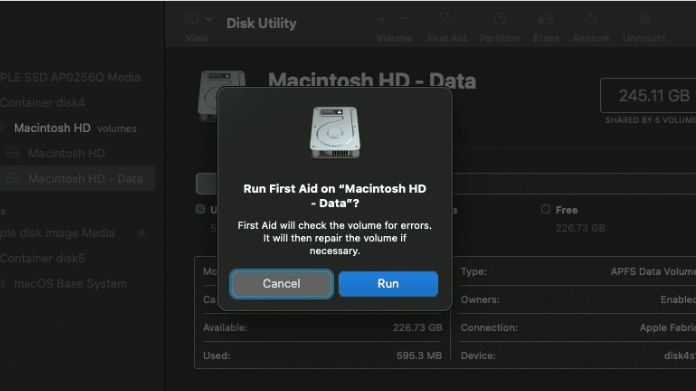
Here’s how:
- Open Disk Utility:
- Navigate to Applications > Utilities > Disk Utility.
- Select the SD Card:
- In the left panel, locate your SD card and select it.
- Remove Write Protection Status:
- Click the “First Aid” button at the top, then hit the “Run” button. The write protection on the card may be removed after First Aid repairs any mistakes it finds.
You can proceed with the formatting process when you’ve verified that the card is unlocked.
How to Format a Write Protected SD Card?
Once you’ve successfully removed the write protection, formatting the SD card is straightforward.
Although you can use common tools like Disk Utility (Mac) or File Explorer (Windows ), SD Card Formatter is frequently more efficient, especially for SD and microSD cards.
SD Card Formatter is designed exclusively for SD cards. It guarantees that the card is formatted according to SD standards, which reduces the likelihood of future compatibility difficulties.
Additionally, compared to typical Windows or Mac formatting choices, it manages the operation more effectively.
Steps to Format With SD Card Formatter:
- Visit the SD card formatter official site
- Select the SD card formatter version that corresponds with your operating system (Windows or macOS) and download it.
- Use a card reader or place your SD card in the card slot on your computer.
- Open the SD Card Formatter program from the start menu or desktop.
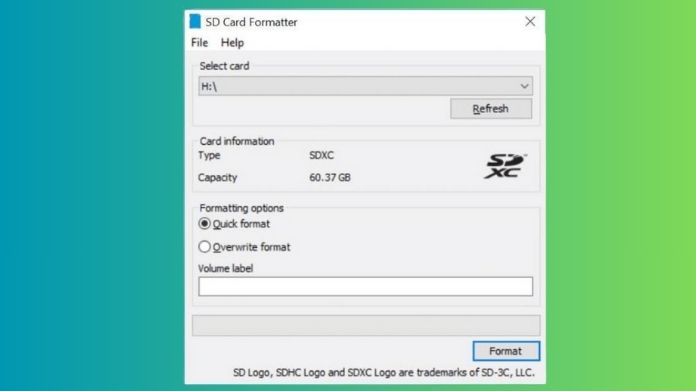
- Choose the SD card that has to be formatted.
- Select the appropriate formatting choices. (Format size modification, overwrite format, and quick format)
- When prompted, click OK to allow the SD card to be formatted by the tool.
Once you’ve formatted your SD card using SD Card Formatter, it will be reset, ready for use, and optimized for performance.
Wrapping Words!
Write-protected SD cards might be inconvenient, but with the appropriate techniques, they can be easily repaired.
Whether you tweak the physical switch, use Diskpart on Windows, or Disk Utility on a Mac, these ways can let you remove write protection and resume using your SD card in no time.
Once the protection is off, formatting the card is simple, and utilizing SD Card Formatter ensures that the process is completed correctly.
With these treatments, your SD card will be like new, ready for your next project or collection of files.